Saturday, November 12, 2016
Halloween Ponies

My girls had some elaborate requests this year. A decided she wanted to be a panda or koala, and I thought "yay! That's easy enough! A hoodie and some face paint!" But then Z decided she wanted to be a pony. A My Little Pony. Rainbow Dash, to be specific...with wings and rainbow mane and tail! And of course, her younger sister immediately changed her mind and wanted to be a pony as well...with wings. And since Rainbow was taken, she decided on Twilight Sparkle, who also happens to be a unicorn, so she needed a unicorn horn. Here are the results!
I used my favourite Bimaa Hoodie pattern from LouBeeClothing for the top and the Halla Lounge Pants from Halla Patterns for the bottoms. And for the ears, manes, tails, wings, and unicorn horn I adapted the instructions from Stitch and Pink.
It took a while, but it was definitely worth it! The pants can be worn anytime because the tails are attached to a wide elastic waistband and the hoodies are fun for those days you want to show off your inner pony :)


Sunday, April 24, 2016
Made For Mermaids Mya Top
These little cuties are both wearing an awesome pattern from Made for Mermaids - the Mya Top. This pattern is amazing. First of all, the sizing, if you follow the pattern measurements, fits incredibly well. Second of all, the PDF pattern is made in layers for each size, so printing just what you need or printing 2 sizes so you can grade easily is a breeze. For this one, I used a size 1 width and a size 5 length for my skinny minis!! Even with such a difference between the sizes, the grading for length was super simple and worked out really well. I finished these up for a contest run by Made for Mermaids to be a pattern tester. Whether I get in or not, I know I will be buying more of their patterns!


Wednesday, March 4, 2015
Carseat Ponchos Tutorial
I've been putting off this project for a while, but with the Canadian weather being what it is, it was time to make my girls some ponchos for the carseat. For those wondering why ponchos and not jackets, take a look: video.
Here are a few action shots of the finished ponchos:


Materials:
- 1.25 m of each fabric (fleece is best for winter)
- zipper (I used a 22" double zipper so it can be opened from the top or bottom to make buckling in and out of the car seat easier)
- matching thread
Making the poncho:
For the hood, I just traced a hoodie that fits nicely and added a 1/4" seam allowance all around. Cut out 2 pieces from the inner fabric (cow print) and 2 pieces from the outer fabric (pink plaid).
Sew the inner hood and outer hood separately using a 1/4" seam allowance. Trim the seam down. I used pinking shears, but with fleece regular scissors are fine as well.


Pin the inner and outer hoods together, right sides together. Sew around the edge of the hood, leaving the bottom open so you can flip it around.

Flip and topstich around the outside. I used 1" in, but this is just to keep the hood from shifting, so this is up to you. Then, pin the bottom inner and outer part together. you can baste if you like; I didn't bother.


Now, onto the poncho part! Cut out 2 circles the size you need, one each from inner and outer fabric. The easiest way to do this is fold your fabric in half and then in half again. Decide on the length of your poncho from neck to bottom. I used 23" (I wanted it to be 22" + I needed a seam allowance). Basically, take your length and add 1". Use a tape measure or metre stick and measure 23" (or whatever your measurement) from the corner out so you have a quarter circle shape. Sorry, I forgot to take a pic of this :( but here is a drawing.

I folded it to *just* accommodate the 23" measurement with the rest left over for the hood. Cut out through all of the layers and when you open it up, you'll have a circle.

Fleece is a bit shifty when you have thick layers, so they may not be perfect circles. Lay them one on top of the other RIGHT sides together and trim any pieces fabric that sticks out. It doesn't have to b a perfect circle, but you want the layers to be the same shape. Pin everything together along the outside. Sew a 1/2" seam all along the outer edge. Don't worry about leaving a gap for turning, we will be inserting a slit later. Trim the seam if you feel like it - I didn't :)

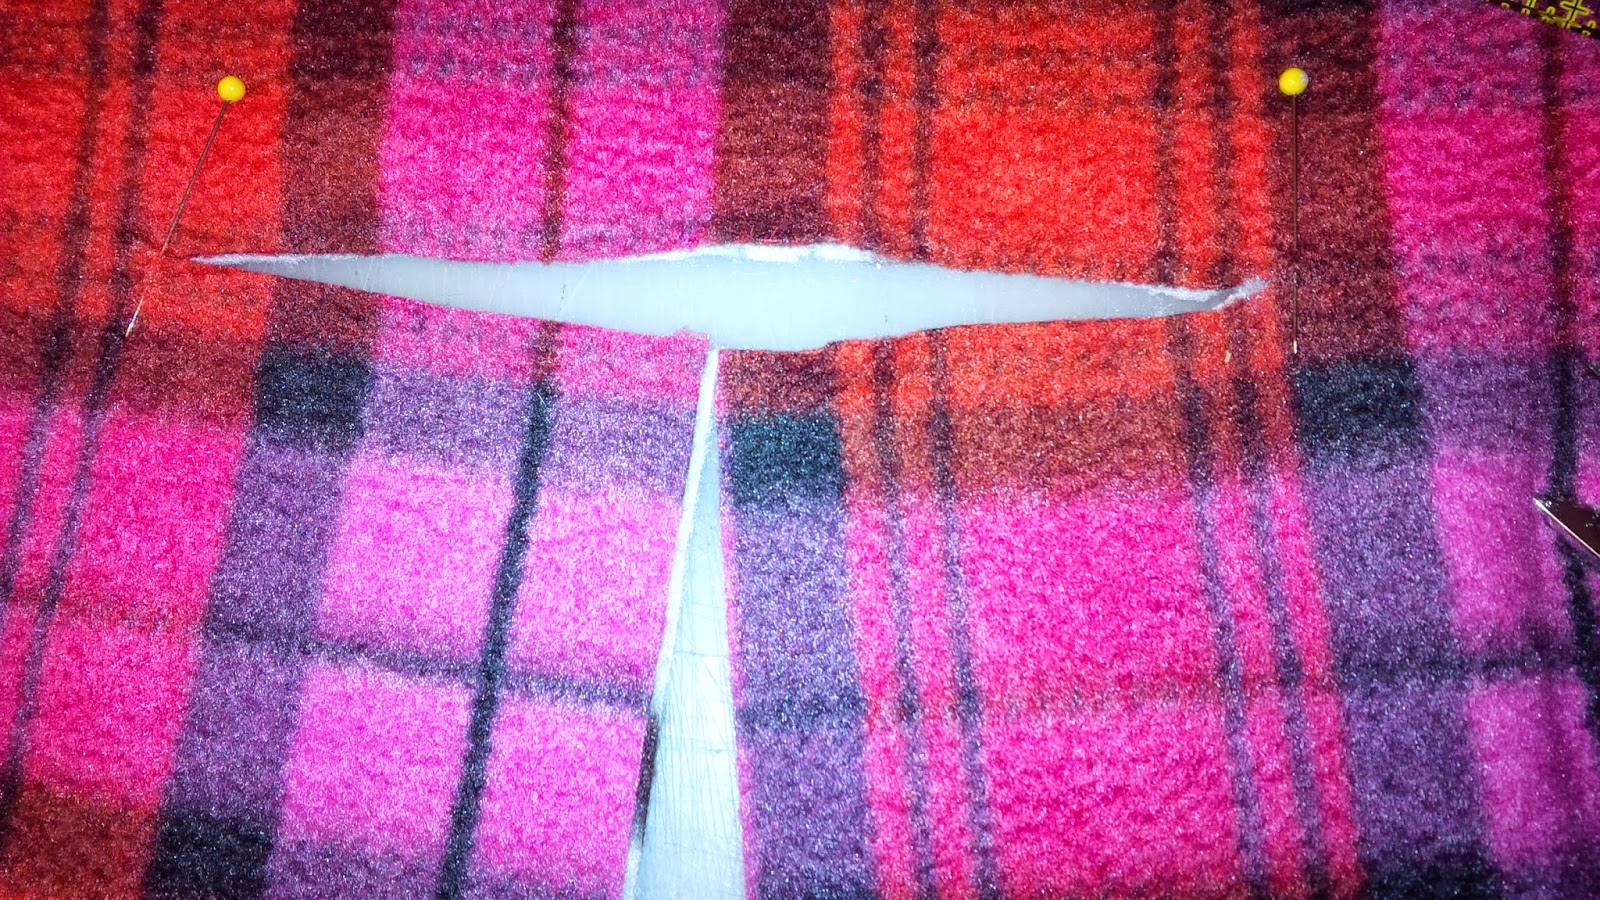
The next drawing shows the cuts for the zipper and hood:

Figure out where you want your zipper - this only matters if you have a pattern that you want facing upright at the front or straight lines you want to keep straight. Measure up from the sewing line to the height of your zipper and mark it. I had a 22" zipper, so that was my measurement + 1/2" for the upper seam allowance (the bottom has already been finished, so it doesn't affect anything.


Fold your hood so that the fronts meet in the middle at centre front. Measure the length of the bottom edge so you know how big to make the hood opening in the body of the poncho. Mine was 7".

Using the zipper line that you created as your centre point, mark the outer edges of your hood measurement. Cut between the points.

Tuck the hood inside and pin it in-between the two poncho layers starting with a 1/2" overhang on either side. Even out the fabric by stretching it a bit if necessary. This will help form the shape of the hood. This part is a bit finicky, so take your time. Sew 1/2" seam to join the hood to the body of the poncho. *Your fabric is still right sides together at this point.*


Flip the whole poncho right side out.
Pin the zipper in-between the centre cut folding the fabric in ~1/2" and pinning in place with a gap where the zipper teeth are. Make sure to tuck in the zipper end so it gets stitched in place. I used a narrow zigzag stitch to stitch through everything catching both layers of fleece.

I also top-stitched 1" along the bottom edge to keep everything together.

And another shot of little Z showing both layers of fabric :)

Sunday, May 26, 2013
DIY: Pre-Shirred Fabric Dress and Chemically Crinkled Dress
 | |
| Front |
For this dress, you basically buy enough fabric to wrap around your chest and then sew a straight line down the side - because the top portion of the fabric has elastic in it, it conforms nicely and then flares out from the waist down.
You measure around your chest and buy that amount of fabric. I needed 84 cm, so I decided to buy 1m to have extra for straps if I decided I wanted them. Well, you need to cut 84cm where the fabric is all scrunched - not along the bottom - or you will not have enough of it. Guess what I ended up with... It wasn't too tragic, I just couldn't walk in the dress unless I took tiny steps, which, of course looks ridiculous.
 | |
| Back w/ Slit |
- measure the top part and get them to cut that length
- pre-wash and dry --> this is cotton fabric, so it shrank a bit
A few moments of quick-thinking and I opened the seam from the bottom up to my knees and made a slit, reinforced the top of the slit w/ a tiny piece of ribbon, and then I could walk!
The great things about this fabric - even with mistakes, it is a pretty easy dress (perfect for beginners) and if you are comfortable with the length as it is, you don't even need to hem the bottom! It truly can be a single seam dress!
Chemically Crinkled Dress: This dress was really easy to make. It is very similar to Pre-Shirred fabric, but there is no elastic, it has been chemically or heat set to make part of the fabric crinkled which allows that part to stretch nicely around the torso and then the rest drapes nicely for the skirt portion.
 |
| Front |
 |
| Back |
 |
| Side |
The differences b/w this fabric and the pre-shirred fabric:
- the fabric is sheer
- the scrunchy-part is not at the top, but all along the middle, so you have to fold it in half to a) lessen the sheerness (unless you want your underpinnings to show) and b) so that you can create a layered effect
To make the dress:
- fold fabric in half so that the crinkly part is along one side (I staggered the other ends so there was a ruffle effect, but you can do it evenly if you prefer)
- measure your chest and use this measurement + seam allowance (I actually just wrapped the fabric around my body and cut where the fabric overlapped. This isn't science, people!)
- NOTE: this fabric has no real stretch, so don't make the top part too tight or you won't be able to get in/out of it. Ask me how I know...
- use extra fabric to make straps
Friday, May 24, 2013
Me-Made Vacation
Some pics are included here. The more detailed ones will be in separate posts for the new items.
The new items include:
- pre-shirred sundress (so easy!) Blogged about here.
- fancy bathing suit cover-up (supposed to be easy, but I made it so much more difficult than necessary!) Blogged about here.
- peplum top using fabric from my first Meetup (Toronto Fashion Sewers) and a pattern suggested and reviewed by MimiG - New Look 6168. Blog post to follow re: my experience with the pattern and review.
|
| Pre-Shirred Fabric Dress |
 |
| Bathing Suit Coverup |
 |
| Peplum Top - New Look 6168 |
Old items that came along on the trip:
- jersey skirt
- cowl dress (everyone's favourite, Vogue 1250)
 |
| Jersey Skirt |
 |
| Cowl Dress - V1250 |
 |
| Sheer Crinkle-top Dress |
More sewing to come!
Wednesday, March 20, 2013
What's in a Name?
In the sewing community there is a trend of naming the dressform, sewing machine and serger. I have been contemplating what I would name my most important tools.
The dressform was an easy one - Lucy. I love Lucy! :) both the show and my dressform. The show encompasses my favourite light/slapstick comedy with a strong female role and a whole lot of silliness. Plus the outfits are fantastic!

The sewing machine I had to think long and hard about - I finally decided that she was a Daisy. I love the 50s and it just sounds perfect - she is a fancy, but hardworking lady, that Daisy :) Daisy is a Singer Ingenuity 7436. I don't think it's made anymore as it is no longer advertised on the Singer website, but you can still get this great machine

Then there is Stella the Serger:

I feel a bit like Stanley yelling "Stella" in anger and ripping my hair out every time the machine does its own thing, which is all the time! Perhaps Stella needs a new name - one that is more positive. Or maybe I need to watch some tutorials on how to adjust the serger...
It occurs to me that there is definite 50s trend here. It just so happens that the 40s and 50s are my favourite fashion eras as well, so it does make sense that Lucy, Daisy and Stella all hail from that time.
The dressform was an easy one - Lucy. I love Lucy! :) both the show and my dressform. The show encompasses my favourite light/slapstick comedy with a strong female role and a whole lot of silliness. Plus the outfits are fantastic!
The sewing machine I had to think long and hard about - I finally decided that she was a Daisy. I love the 50s and it just sounds perfect - she is a fancy, but hardworking lady, that Daisy :) Daisy is a Singer Ingenuity 7436. I don't think it's made anymore as it is no longer advertised on the Singer website, but you can still get this great machine
Then there is Stella the Serger:
I feel a bit like Stanley yelling "Stella" in anger and ripping my hair out every time the machine does its own thing, which is all the time! Perhaps Stella needs a new name - one that is more positive. Or maybe I need to watch some tutorials on how to adjust the serger...
It occurs to me that there is definite 50s trend here. It just so happens that the 40s and 50s are my favourite fashion eras as well, so it does make sense that Lucy, Daisy and Stella all hail from that time.
Subscribe to:
Posts (Atom)